Showing posts with label Recipes. Show all posts

Monday, March 5, 2012

Kale Chips Healthy Alternative To Potato Chips


Don't these look just so delicious?!

Kale chips are so easy to make and so yummy!!

And they are healthy!!!

Read about Kale and it's health benefits HERE.

Ready to make some?

Ingredients:
  • 1 bunch kale
  • 1 tablespoon extra virgin olive oil or olive oil
  • 1 teaspoon seasoned salt (I use Himalayan Pink Salt)

Directions

  1. Preheat an oven to 350 degrees F (175 degrees C). Line a non insulated cookie sheet with parchment paper. ( I just put mine straight on the cookie sheet)
  2. With a knife or kitchen shears carefully remove the leaves from the thick stems and tear or cut  into bite size pieces. Then wash and thoroughly dry kale you can use a salad spinner. Drizzle kale with olive oil and sprinkle with seasoning salt.
  3. Bake until the edges brown but are not burnt, 10 to 15 minutes.               

Then eat up:)  So good!!! Be sure to make two batches-chances are they won't last long....


Thursday, February 3, 2011

Valentine's Day Twinkie Dessert

Want an idea for a Romantic dessert for two?
Then Woman's Day has something for you!
This is an easy 1-2-3 type recipe for a great Dessert:

Valentine Dessert for Two
By Woman's Day Kitchen from Woman's Day


This heartfelt dessert keeps things sweet and simple, with Twinkies cut into shape and smothered with a thinned red raspberry jam and a sprinkling of fresh raspberries for added pizzazz.

Active Time: 2 minutesTotal Time: 2 minutesRecipe Ingredients

3 Tbsp seedless red raspberry jam

1 cup fresh raspberries

2 Twinkies snack cakes

Recipe Preparation

1. Stir jam and 1 Tbsp water in a bowl until smooth. Add raspberries; toss gently to coat.

2. Cut Twinkies in half diagonally, starting about 1 in. down from top left to 1 in. from bottom of opposite side. For each heart, put 2 halves together on 1 serving plate. Spoon raspberry mixture over and around hearts. Garnish with mint, if desired.

Monday, December 13, 2010

Here's the Monkey bread we made last week

UPDATE: Recipe below
Soooooooooo goooooood!!!


If you are looking to make something for Christmas
pick this recipe
it is so yummy
bet you can't eat just a piece!

Boy Wonder and I are better-still kinda under the weather
but at least we aren't....uh...you know
cookies are being kept down
and I can handle that for sure!!

Hoping to get a chance to put up my next giveaway-and I am currently awaiting for the Amy Butler company to respond for what I can give away here!! 
Squeal!!!
Yup you heard me right
 AMY BUTLER!!!!!!
I can't wait!
Have a wonderful Monday!
We will even though we are under the weather!
For the Lord is our strength!

MONKEY BREAD:
4 cans refrigerator biscuits (about 40)
1 1/2 tablespoons cinnamon
1/2 cup butter
1 cup white sugar
1 cup brown sugar, packed
1/2 cup pecans, raisins and/or coconut, if desired (we don't add this)


Cut each biscuit into 4 pieces. Pour sugar and cinnamon into a plastic bag and mix.
Add biscuit pieces, several at a time; shake to coat well.
Place pieces in a buttered tube or Bundt pan until all are used.
Sprinkle layers with nuts, raisins or coconut.
Bring brown sugar and butter to a boil in saucepan. Cool 10 minutes, then pour over top of biscuits.
Bake at 350°F for 40-45 minutes. Allow to cool 15 minutes before removing from pan. Turn upside down to serve.
Bring brown sugar and butter to a boil in saucepan. Cool 10 minutes, then pour over top of biscuits.
Bake at 350°F for 40-45 minutes. Allow to cool 15 minutes before removing from pan. Turn upside down to serve.

Thursday, December 2, 2010

Recipe? Monkey Bread...Yum Yum!

4 cans refrigerator biscuits (about 40)

1 1/2 tablespoons cinnamon

1/2 cup butter

1 cup white sugar

1 cup brown sugar, packed

1/2 cup pecans, raisins and/or coconut, if desired


Cut each biscuit into 4 pieces. Pour sugar and cinnamon into a plastic bag and mix.
Add biscuit pieces, several at a time; shake to coat well.
Place pieces in a buttered tube or Bundt pan until all are used.
Sprinkle layers with nuts, raisins or coconut.
Bring brown sugar and butter to a boil in saucepan. Cool 10 minutes, then pour over top of biscuits.
Bake at 350°F for 40-45 minutes. Allow to cool 15 minutes before removing from pan. Turn upside down to serve.
Bring brown sugar and butter to a boil in saucepan. Cool 10 minutes, then pour over top of biscuits.
Bake at 350°F for 40-45 minutes. Allow to cool 15 minutes before removing from pan. Turn upside down to serve.
**********
Of course I have to share what Boy Wonder said after he ate a piece of it:  "Oh, no? Monkey Bread?! Will I turn into a monkey?" heheheeh-so literal at times-he is so funny!

Friday, November 12, 2010

Family Filled Friday's and Candy Button Recipe

Family Filled Fun Day
Looking forward to enjoying Cici's pizza with my family
maybe we will stop at Joann Fabrics
{*wink wink*}

Well, while I am enjoying my family
Here is the recipe for

Candy Buttons

12 Servings

Prep 30 min (plus standing)

Ingredients:

1 1/2 cups confectioners’ sugar

1 egg white

3 drops yellow food coloring

3 drops blue food coloring

Piping is just like using a toothpaste tube, so the same rules apply: Squeeze from the end and keep the tip clean. (Save money and make your own pastry bag. Take a resealable plastic bag and snip off the tip of one corner.)

Directions:

1.Cut white paper into twelve 2-by-11-inch strips. Using an electric mixer, beat the confectioners’ sugar and egg white until thick and smooth, about 5 minutes. Divide the icing into 2 small bowls. Stir the yellow food coloring into one batch and the blue food coloring into the other. Cover the blue icing with plastic wrap.

2.Arrange the paper strips side by side on a work surface. Scrape the yellow icing into a small, resealable plastic bag and snip off a tiny corner. Pipe out the icing onto the paper strips in dots, about 1/3 inch apart in even rows of 3. When about a quarter of the yellow icing remains, add approximately the same amount of blue icing to the bag, stirring with a toothpick. Continue to pipe green icing dots onto each paper strip. Transfer the blue icing to another small, resealable plastic bag and continue piping. Let the dots sit at room temperature until hardened, 12 hours or overnight.


Hope you enjoy them!

Thursday, November 11, 2010

Homemade Chicken Noodle Soup and Herb Noodles-Guest Post

Some of you have requested that I post more recipes
so here is your "scoop" for the day.
Jacqueline from Purple Chocolat Home 
has agreed to guest post her recipe for homemade herb noodles and chicken soup. 
It looks so yummy...
I can't wait to try it!
You have to go over and check out her other recipes
I am hoping to have her guest post again very soon : )
************
Nothing warms the soul like homemade
chicken noodle soup with homemade noodles.
Colder weather begins and I start craving soups and breads.


With the change in weather a really nasty cold caught me.
All I could think of was chicken noodle soup. 
My husband had bought a rotisserie chicken at the store and
the leftovers looked like the perfect thing for soup.
First I have to tell you my gardening failure.
Our garden has been wonderful this year.  We
had tried a few new things.
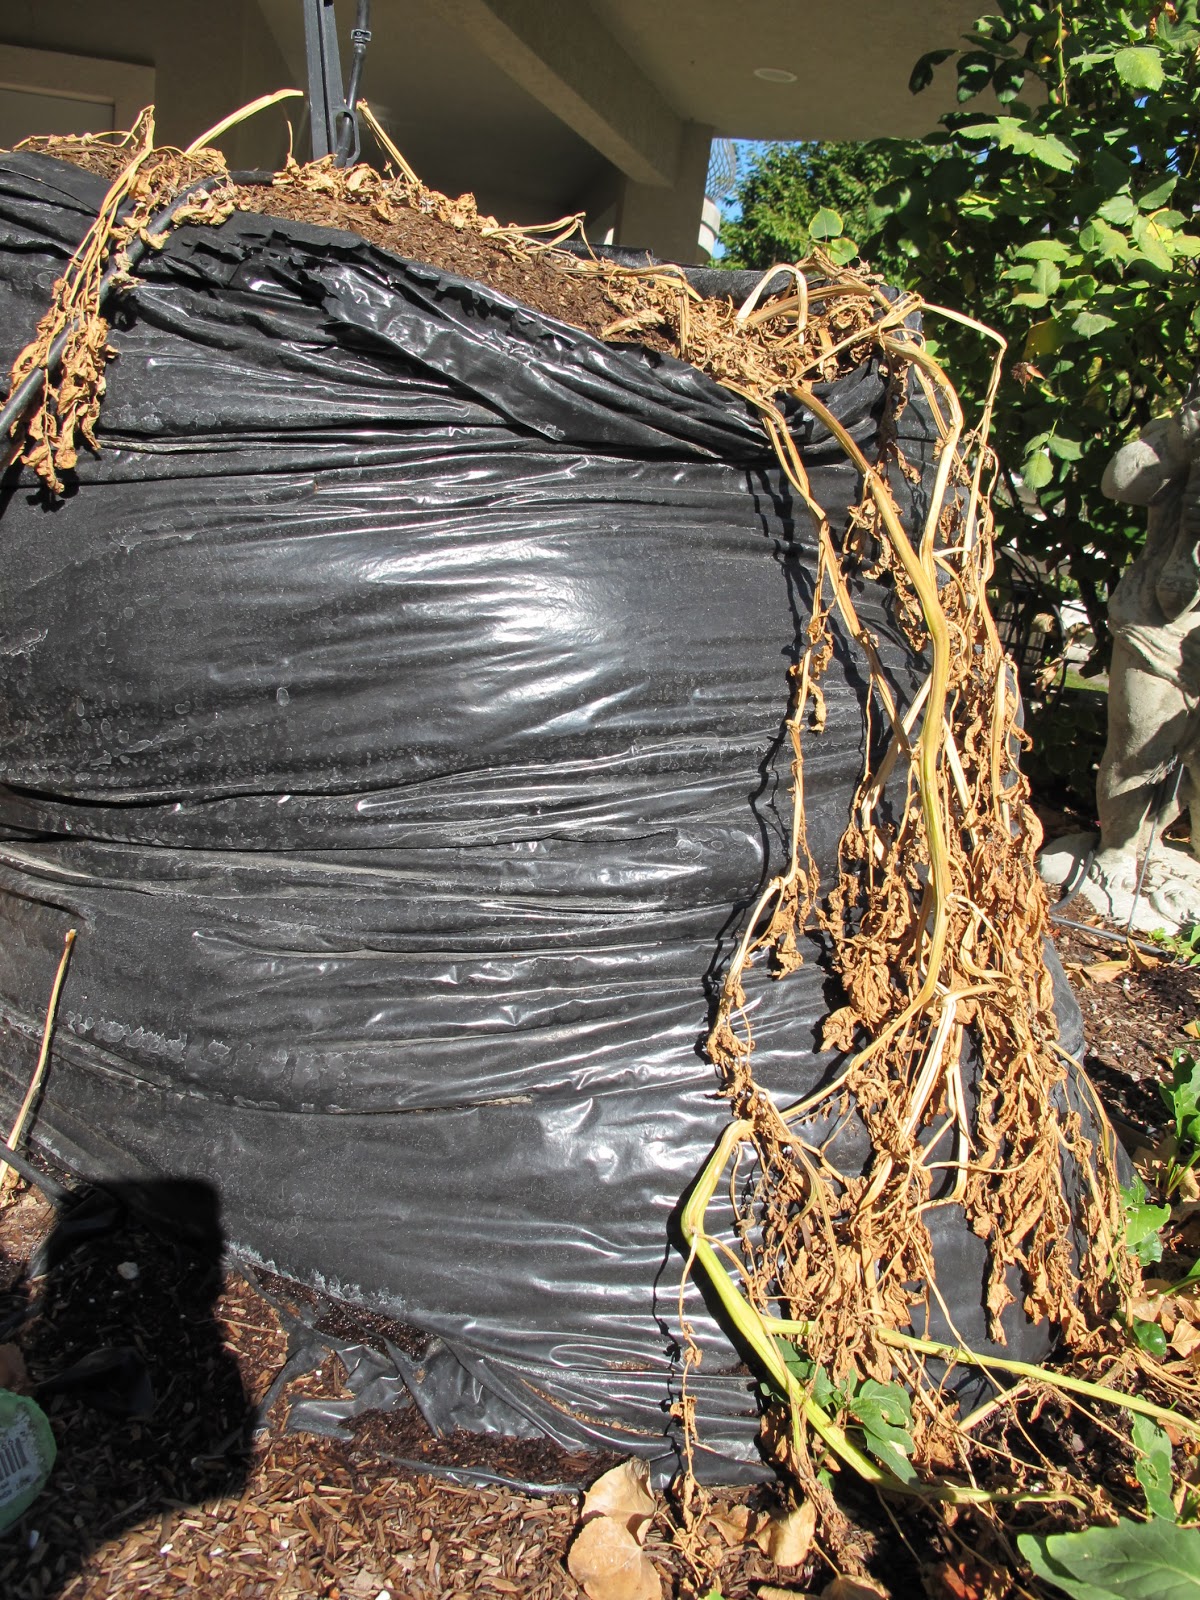
The thing I was really excited about was a new way
that you can grow "LOTS" of potatoes.
You can either do this in a large garbage barrel or
in a large garbage sack.   My neighbors were trying
the barrels, so I decided to try the sack.
The idea is that you provide drainage at the bottom
and begin planting your potatoes and cover with 6 inches of dirt. 
Then when the potato plants come above the surface of the dirt
you continue to add dirt in 6 inch increments and
the plants continue to grow up through the dirt
and are supposed to send tubers out through all
the layers.


Well, here is my potato stash a couple of weeks ago.
You wait for the plants to die off before you harvest.
I love to bring the grandkids out to the garden so they
learn to love gardening.  So I brought them out and I
was so excited.  "You can expect to produce up
to 50 lbs. of potatoes." 


This was just too exciting!  I could hardly wait.  Harvesting
potatoes is like the ultimate treasure hunt.  So we sliced
the bag, camera ready!  I couldn't wait to weigh my harvest.
The grandkids were excited too!
We began sifting and sifting, they were helping!


THIS WAS IT! 
All the way to the very bottom of the bag, this was it!!
Mind you, the biggest one here was 2 1/2 inches
across.  Now I have grown potatoes many
times.  I have never had such a failure.  I called the
neighbors and they had the same problem.  We
don't have a clue what we did wrong as bloggers
everywhere are showing huge potatoes and huge
harvests. 

Anyway, we were not wasting those expensive potatoes
(just the price of the bags of dirt to fill that garbage sack!)
So they went into our soup for today.


Herb Noodles
1 1/2 C. flour
2 eggs
2 tsp. olive oil
(I used my Garlic Basil Olive Oil)
2 T. water (or more depending on humidity)
1/2 tsp. dried thyme
1/2 tsp. dried basil
1/2 tsp. dried parsley
2 T. parmesan cheese
1/2 tsp. salt

Place all ingredients in a food processor.  Mix
until the dough forms a ball.  Add more water if needed.


Cut dough in half and roll out as thin as desired.  Dust with
flour then roll up and slice into desired size noodles.  Remember
the noodles will swell quite a bit.
I like to cook my noodles in a separate pot of boiling water
so my broth doesn't get cloudy.  Cook about 2-3 minutes.

Chicken Noodle Soup Recipe
2 chicken breasts or meaty bones of 1 chicken
8 C. water
1 onion, roughly chopped
1 large carrot, roughly chopped
1 stalk celery, roughly chopped
2 T. chicken bouillon
1/2 tsp. dried thyme
1/2 tsp. white pepper
1/2 tsp. salt
1/2 tsp. garlic powder

Additional vegetables as desired - my potatoes!
Place chicken or meaty bones in large pan and
cover with water.  Add remaining ingredients except
the additional vegetables which you will add at the
end.  Bring to a boil and then turn down the heat.
Let simmer about 1 hour.  Strain the soup.  Skim
off any foam.  Chop the meat into bite size pieces.
If using the meaty bones, pull pieces of meat off bones.
Bring the water back up to the original level.
Add any additional vegetables you
desire and cook them until tender. Chop and add the carrots
you cooked in the broth and the onions and celery if
desired.  I don't usually use the onions or celery.
Add the noodles you have already boiled.
Heat through.
Ladel into bowls and garnish with parmesan
cheese if desired.


My favorite ingredient in this soup is the thyme.  It gives it such
a wonderful flavor.

After eating this my teenage son informed me
that I am to have a pot of soup
ready all winter for when he comes home from school.
Now there is a compliment.

In keeping with Red Couch Recipe's challenge
to include something we are grateful for in every post
this month, I want to say how grateful I am for a
wonderful husband, who doesn't complain about
my blogging, my tablescaping, my shopping for more
plates, etc., etc., etc.  I feel so blessed and am glad that
we want to be married for all eternity.

Thursday, November 4, 2010

Recipe for sharing-Red Velvet Cupcakes....yum


Makes 30 (1 cupcake) servings.

Prep Time: 20 minutes

Cook Time: 20 minutes
2 1/2 cups flour
1/2 cup unsweetened cocoa powder
1 teaspoon baking soda
1/2 teaspoon salt
1 cup (2 sticks) butter, softened
2 cups sugar
4 eggs
1 cup sour cream
1/2 cup milk
1 bottle (1 ounce) McCormick® Red Food Color
2 teaspoons McCormick® Pure Vanilla Extract

1. Preheat oven to 350°F. Mix flour, cocoa powder, baking soda and salt in medium bowl. Set aside.

2. Beat butter and sugar in large bowl with electric mixer on medium speed 5 minutes or until light and fluffy. Beat in eggs, one at a time. Mix in sour cream, milk, food color and vanilla. Gradually beat in flour mixture on low speed until just blended. Do not overbeat. Spoon batter into 30 paper-lined muffin cups, filling each cup 2/3 full.

3. Bake 20 minutes or until toothpick inserted into cupcake comes out clean. Cool in pans on wire rack 5 minutes. Remove from pans; cool completely. Frost with Vanilla Cream Cheese Frosting.

Vanilla Cream Cheese Frosting
Vanilla Cream Cheese Frosting: Beat 1 package (8 ounces) cream cheese, softened, 1/4 cup (1/2 stick) butter, softened, 2 tablespoons sour cream and 2 teaspoons McCormick® Pure Vanilla Extract in large bowl until light and fluffy. Gradually beat in 1 box (16 ounces) confectioners' sugar until smooth.

Per serving:

Calories: 272
Fat: 12 g
Carbohydrates: 38 g
Cholesterol: 63 mg
Sodium: 178 mg
Fiber: 1 g
Protein: 3 g

Courtesy of McCormick